

Seed-Trade Secrets: Your old seeds might still grow!
Out with the old, in with the new? Not so fast!
 Even though it's our livelihood to sell seeds, it's also part of our mission to help people become more self-sufficient and reduce their planetary impact. One way we do this in the garden is by saving seeds from the plants we grow. But saving leftover seeds that were not planted the previous season is a green practice as well. So, while you're making your list of new seeds to buy, pull out your box or bag or jar or pile of old seeds and take stock.
Some gardeners start fresh every year, throwing out any seeds they did not plant the previous spring. The impulse is understandable, no gardener wants to waste precious space by planting seeds that will not grow. But I'll let you in on a little seed-trade secret, many of the seeds you order were saved and stored from previous years, and you can do the same thing at home. The trick is knowing if the seeds are still viable.
Informal "Germ Testing"
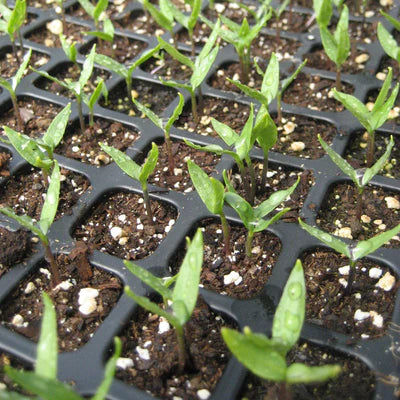
So how can you determine the viability of your seeds before you plant them? Unfortunately, you can't tell just by looking at them. So, you somehow have to test them. The informal and most common way is simply to sow them in your flats or in the open garden during the early part of the window for planting each crop. Planting on the early side allows you to observe the germination of your seeds and react quickly if you notice any problems. This functions as a sort of informal germination test.
Unfortunately, this easiest of methods doesn't allow you to order more seeds to replace low-germ lots ahead of time. So it can cause all sorts of havoc if you're depending in any way on the crops you are producing.
Formal Germ Testing: How to Do It Yourself
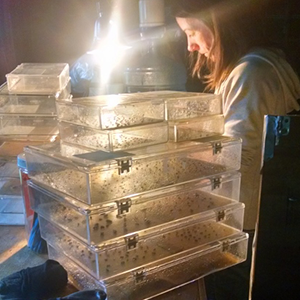 Each year, we do germination tests on our saved seeds and carried-over seeds to determine which still have high germination rates. Our method involves special germination paper, following the detailed guidelines in the American Organization of Seed Analysts (AOSA) binder, plastic hinged boxes, and a temperature controlled germination chamber. But you don't need all that to do it at home!
Here's an easy DIY version for checking germination rates of your old seeds that will help you save money and conserve resources—two great New Year's resolutions combined in one simple act that's good for your garden!
Step 1: Before you get started, check the "packed for" date on your seed packs. Every plant family has a general length of time seed can be stored. If you're past 3 years, chances are you're going to have low germ or low viability. You can still plant, but after 5 years your chances of success become pretty slim, except for some beans, peas, and cucurbits.
There is a short list of crops that, in our experience, are rarely worth re-testing, as their longevity under common home storage conditions is too short to bother with testing.
- Alliums such as onions, scallions, chives, garlic chives, and leeks are among the shortest-lived seeds. Replace every year or, at most, every two years.
- Umbels such as carrots, parsley, parsnips, dill, celery, and lovage are also extremely short lived. Replace every year or, at most, every two years.
- Among flowers, flax, lupine, larkspur, and Johnny Jump-Ups (violas) are generally quite short lived, averaging only 1-2 years in storage.
Other than these crop types, all other seeds are fair game! Of course, it makes sense to evaluate the volume of seed you have available before spending a signficant chunk of it on a germ test. So focus more on the crops for which you have a good stock of seed on hand, and just plan on re-purchasing those you do not.
Materials:
- Strong paper towels
- Water
- Zip locks (reused ones are fine!)
- Plastic or glass bin (optional)
- Location in your home that maintains steady moderately warm temperatures (for most common garden crops). This can be the hardest piece of the germination test to work out!
Instructions:
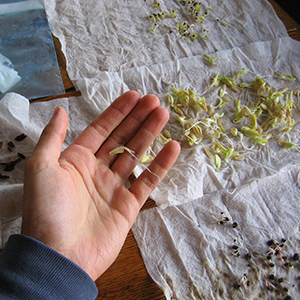
- Wet the paper towel and gently ring out so that it is damp but not dripping. Flatten the paper towel and place 10, 50, or 100 seeds in one quadrant. Official germ tests call for 400 seeds, but at home, even 10 seeds will give you useful information. Fold the paper towel in quarters so that the seeds are sandwiched in the middle. Press flat very gently. The goal is not to smother the seeds but to ensure they have contact with the moist paper towel substrate.
- Place the paper towel in the ziplock bag and seal. Label the bag with the name of the variety, date, number of days to germination, and the seed count. If you have a very warm spot that is consistently around 72 degrees, you can place your tests there. Otherwise, you'll have to rig up—as safely as possible—a warm comfy spot for the seeds. A low-wattage heat mat for setting under seed-starting flats can work; just pile up some towels to moderate the heat instensity. A cozy spot near your heating system's output might also work. Whatever you do, just be cautious of the combination of heat and plastic baggies, and take steps to avoid a heat source coming into direct contact with your tests. (The goal is not to encase your seeds in melted plastic!)
(Note that some seeds—especially those of flower varieties, even more especially those of perennial flowers—require rather elaborate temperature swings to initiate germination. But the roughly 72 Fahrenheit setting will work for a wide range of common garden crops including many annual flowers.) - Check each bag when the seeds should be germinating. Look for small sprout tips. We check for a few days and keep count as some seeds will germinate earlier and some later. Germination rates are always listed as percentages. If you put 10 or 100 seeds, it's easy to calculate your germination rate for the batch. If 8 out of 10 seeds germinated, you have an 80% germination rate. Record your germination rates on the original packets.
Unless it is a special variety, any seed lot that has less than 50% germination is usually not worth keeping. Chances are that even the ones that can muster germinating will not be that vigorous. Compost them and order replacements.
For the seeds that you can count on, make sure to store them in airtight, dry, and dark conditions until spring.