Sometimes, seed saving and good eating go hand in hand.
Seeds and Salsa
Gardeners love simple recipes. After all the effort of growing and caring, watering and waiting, and finally harvesting, it’s a delicious relief to have a quick fresh meal with no fuss. There are many garden-to-table-instant-gratification recipes where you can just pick, prepare, and eat, preserving the fresh flavors, nutrients, and colors of just picked veggies and herbs. One such recipe is Salsa Fresca. All it takes is the right proportions and some chopping to make a quick delicious chip dip.
But recipes like this are deceptively simple. As more eaters become interested in gardening and where food comes from, they are discovering the complexity of how those ingredients made it to their tables. Behind the scenes of every recipe is a farmer or gardener. As they say, no farms no food. As a gardener, you can start to gain insight into the same questions aware eaters are asking, but about seeds, by learning to save seeds in your own garden. No farms no food, no seeds no farms!
Today, with the tragic continued loss of genetic diversity and corporate patenting of seeds, saving and celebrating heirloom and open-pollinated seeds is more important than ever. The best way to get started is by doing. And luckily, in many cases seed saving and good eating go hand in hand.
Here are some basic seed saving tenets. With these seedy thoughts in mind, you can learn to make Salsa Fresca and save seeds for next season while making it.
Step one: Be curious.
Seed saving used to be an integral part of many farms and gardens. Saving seeds was as practiced and assumed as harvesting a ripe tomato. Over time, as the landscape of seeds has changed from the intimate to the industrial, growers became so used to purchasing seed that we began to lose both the diversity of varieties as well as the skills needed save seeds at home. It has not gotten more difficult to save seeds over the last 10,000 years, just less common. You don’t need a degree to save a seed. All the practice requires is some curiosity, observation, and a desire to become a better gardener.
Step two: Be patient.
As gardeners, we’re used to interrupting our plants at their most delicious or beautiful moments. A flower just before its peak that’s perfect for picking. Cherry tomatoes hanging heavy all too ready to pop in your mouth. But these moments occur before the plant’s full life-cycle has played out. What would your carrot do if you never pulled it up out of the ground? Before you plant, think about what you want to save seeds from. Before you eat, think about saving some seeds. It may take a little self-discipline not to gobble up your harvest, but it’ll be worth it.
Step three: Be experimental.
If you’ve never tried saving seeds or are feeling like you don’t know where to begin, the best place to start is with your plants. Let them go. By that I mean let them grow. Choose a few plants that you will let live their entire life cycle. By letting it go you will gain a better understanding of the plant, experience the joy of nurturing it through its full life, and get to see what it needs to do to produce seed. You may not get a ton of seed, or any at all, but your first part of your seed collection is collecting plant knowledge.
Step four: Be the bee.
Seed saving is about a balance of intimacy and isolation. There is closeness between the bees and the plants that we all secretly envy. When you become a seed saver you become the bee. Once you graduate from beginning seed saver to avid seed saver you will need to get more familiar with pollination. Since you are working with heirloom and open-pollinated varieties, they can cross pollinate. Your sweet peppers can cross with hot peppers and take on some heat the next year. Your butternut squash can cross with your cheese pumpkin: and it might not be that tasty! Bees don’t care, but we do. By learning to be the bee we can begin to understand plants’’ pollination needs.
Step 5: Start with good seed.
To save seeds that will grow true to type, be sure to select from heirloom or open-pollinated varieties. Seed saved from hybrid tomatoes will not grow true but will produce offspring with a wide range of dissimilar characteristics.
Step 6: Connect and share.
Some of the best resources for learning about gardening and seed saving are other gardeners in your neighborhood. Ultimately, one person saving seeds in their own garden is not enough to turn the tide of corporate control of seeds and loss of heirloom and open-pollinated varieties. By coming together as gardeners and sharing our saved seeds through seed libraries, swaps, and exchanges, we can make a difference.
Here’s the recipe, but, before you go crazy chopping and mincing or dipping chips, think about seeds! Before you prepare your salsa, follow the seed saving instructions. When you’re done you can make your salsa knowing you’ve also saved seeds to replant next spring.
Seed Library Salsa (all of these varieties are available in the Seed Library catalog)
4 large tomatoes (we use a mix of Isis Candy Shop, Goldie, Cosmonaut Volkov)
2 large sweet peppers or 4-5 small (Doe Hill and King of the North)
1 hot pepper (Matchbox)
5-6 medium scallions (Evergreen Bunching if you are not growing scallions you can use Chives)
10 sprigs Cilantro
1 clove garlic (if you are not growing garlic you can use Garlic Chives)
Optional non-garden ingredients:
1 tbl. Lime (I wish we could grow limes in the garden, but you can grow one in a pot.)
1 tbl. olive oil (nope, we can’t grow olives either)
More Options: Try different kinds of tomatoes and peppers for different color and flavor salsas. You can also add fresh cucumbers like Muncher, watermelon like Blacktail Mountain, sweet corn like Ashworth, and other herbs like Genovese Basil, Papalo, or Summer Savory. Decorate with beautiful and tasty Variegated Nasturtium leaves and flowers.
Directions:
- Chop the tomatoes into half-inch chunks.
- Finely mince the garlic, cilantro and scallions.
- Mince the sweet peppers.
- Carefully mince the hot pepper.
- Mix, let sit for 10 minutes. Dig in.
Assuming you successfully grew the ingredients, here’s how you can save seeds from each of them at the same time you are making your salsa.
Saving Seeds from Heirloom Tomatoes
OBSERVE
Start by eyeing a few of your best-looking fruits as they mature on the vine. It’s best to save seeds from your top performers, so you may even want to sneak a little bite first to make sure you’re saving seeds from your best-tasting tomatoes.
PREPARE
Once you’ve selected the fruit from which you’ll make salsa and save seed, gather together a glass jar, a metal strainer, an unwaxed paper plate or coffee filter, and an air-tight container.
PROCESS
1. Let your tomatoes ripen on the vine or even start to go a little soft.
2. Pick the tomatoes from different plants—but don’t eat them yet!
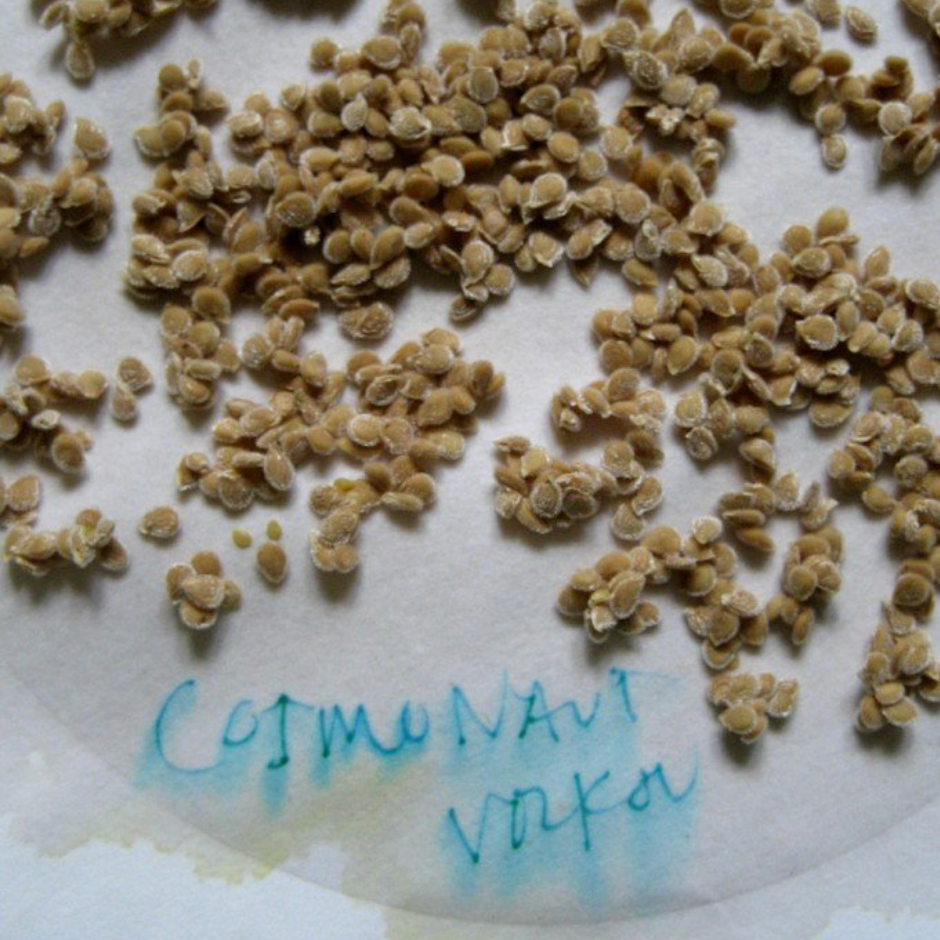
3. Slice the tomatoes in quarters and squeeze the pulp and seeds into the jar. Make sure to keep varieties separate and labeled.
4. Set aside the fleshy portions of the tomatoes for your salsa.
5. Add to the jar the same amount of water as pulp.
6. Let the pulp/water mixture sit for three to five days or until a smelly layer of white mold has formed on the surface. Don’t eat this stuff.
7. Skim off the mold and rinse seeds in strainer until clean.
8. Place seeds on paper plate, label, and let air dry. If the weather is humid and stagnant, provide a fan to help with air circulation. For small batches you can let the seeds dry right in the strainer.
9. Store dry seeds in a labeled, air-tight container in a cool, dark place.
10. Plant your seeds next season! Tomato seeds, when kept cool dark and dry can last for 3-4 years.
A note on Cross-Pollination
There are different opinions as to how often different varieties of tomatoes cross with each other. In general, regular leaf tomatoes cross less and potato leaf and cherry varieties cross more. The recommended isolation distance between varieties is 25 to 50 feet. However, many home gardeners successfully collect seed in tight spaces. Give it a try!
Saving Seeds from Heirloom Peppers
OBSERVE
Start by eyeing a few of your best-looking plants/fruits as they mature on the vine. It’s best to save seeds from your top performers, so you may even want to sneak a little bite first to make sure you’re saving seeds from your best-tasting peppers.
PREPARE
Once you’ve selected the fruit from which you’ll save seed, gather together a cutting board, sharp knife, gloves, strainer, unwaxed paper plate or coffee filter.
PROCESS
1. Let your peppers fully ripen on the vine.
2. Pick the peppers from different plants—but don’t eat them yet!
3. Cut the top off of bell and stuffing peppers and pull out the seed crown. For hot peppers wear gloves and slice lengthwise and scrape out the seeds with a small spoon. (There’s nothing worse than chopping up hot peppers and then rubbing your eye or picking your nose.) Make sure to keep varieties separate and labeled.
4. Set aside the fleshy portions of the peppers for salsa—you don’t need them for seed-saving.
5. Rinse seeds gently and place seeds on paper plate, label, and let air dry. If the weather is humid and stagnant, provide a fan to help with air circulation. For small batches you can let the seeds dry right in the strainer.
9. Store dry seeds in a labeled, air-tight container in a cool, dark place.
10. Plant your seeds next season! Pepper seeds, when kept cool dark and dry and last for 3-4 years or more.
A Note on Cross-Pollination
Peppers will cross-pollinate freely in the garden. As the “hot gene” is dominant, sweet peppers that cross with hot peppers tend to inherit some heat. In order to make sure that the peppers don’t cross, you need to isolate them from each other. There are a few ways to accomplish this.
Distance: Isolation distances range from 50 ft to one mile. Smaller distances are more for home gardeners saving seed for themselves with limited space vs. larger distances for seed companies growing commercial seed on expansive farms. Many of the gardeners in the Seed Library have small gardens and don’t have even 50 feet of separation between varieties.
Caging: We recommend caging peppers, and that’s just how we do it here on Seedy Farm. Caging is a simple way of preventing insects from visiting flowers between varieties. You can use your own creativity and simple materials to make an isolation cage. Cages can be made in any shape out of materials that let in sun and rain such as screening. We use row cover, which also has some insulating properties. The peppers love to be hot!
Saving Seeds from Other Ingredients:
Cilantro:
This herb (loved by some, loathed by genetically jilted others) is a two-for-one deal. When your cilantro bolts, let it go. It will grow tall, flower, attract beneficial insects to you garden, and then form jade green beads. These will turn brown and dry on the plant. Harvest them and you’ve got coriander for spice and seeds to plant in the fall. Keep in mind that cilantro is not so tasty after it bolts. Try succession sowing (planting seeds every few weeks) so that there are always some that are edible and some going to seed.
Scallions:
These quick growing onions are biennials just like most other alliums. That means that while they will grow and produce pungent fodder their first year, they will not flower and go to seed until the following season. For gardeners in cold climates, that means allowing the plants to go dormant for the winter. The following season the plants will grow back and form globe-shaped flowers. When the flowers fade, small lobed pods will form. When the pods dry and the first seeds start to fall out, harvest the seed heads. Allow to dry for a few days, then thresh by rubbing seed heads together between your hands.
Garlic:
You can save seeds from garlic, but when someone is talking about planting seed garlic they are actually referring to cloning. It sounds sci-fi, but it’s not like cloning sheep: garlic naturally reproduce this way. All it means in this case is saving some of your individual cloves to replant. Choose your biggest, healthiest cloves, split them up, and replant in the fall. They’ll come up next spring.
Watermelon: (just in case you like a sweet and fruity salsa)
It’s best to grow just one variety when aiming to save seeds. For northeast gardeners we recommend Sugar Baby or Blacktail Mountain, both smaller, shorter season melons. Grow as you normally would. Harvest when ripe. Eat, enjoy, and invest in a spittoon. That’s about all it takes!


