Last week, we talked about winter garden projects that can be done from the comforts of a warm home. This week, it is still winter: the air is thin, the ground is hard. But, the days are getting longer, Imbolc is behind us, spring in front! Here are a few projects that help dip our toes into the season, that let us spend time in between the couch and the garden, in the garage or thrift store (and, a handful more to keep in mind for the next thaw).
1. Fix Your Tools!
With good care, good tools will stay by a gardener’s side longer than some perennials and even beloved pets. They will change, over time, to reflect the body of the person who works with them and the two will slowly transform into a united and experienced team.
First step - clean! Clean tools will not only last longer, but will reduce the chance of disease and fungus traveling into the spring garden on the back of your favorite trowel or rake. Use a wire brush to get rid of mud and dirt stuck on from last season. Use steel wool or light sandpaper to remove rust from metal. If planting in containers, don’t forget to give your pots a good rinse and wipe too.
Next - sharpen! Hoes, shears, knives, pruners, loppers, scissors, and shovels benefit from at least one sharpening per season (hoes and other regularly used cultivating implements require much more frequent sharpening to stay effective, as much as once a week depending on use). To sharpen, put a little linseed oil on the edge or blade side of the tool. Then, using a whetstone, file, or diamond hone, file the blade. For shovels and other tools not used for cutting, filing at a 15-20 degree angle is best. This is called a working angle and will help the instrument last longer than if filing to a very sharp point. For loppers, knives and other cutting devices, a sharper, 40-45 degree angle is best. And, please: always wear thick gloves and be careful: pull the file away from your body and don't allow your arm to cross the metal edge at all.
Wooden handles need attention too. Lightly sand them down to reduce the chance of pesky splinters. If the handle has cracked, you can make your own or purchase a replacement at the hardware shop or garden supply. (If you can’t get the old one out, throw the whole tool into a fire until remains of the old wood burn right out.)
Then, re-oil from top to bottom. Although some suggest using motor oils for this step, we prefer to stay away from petroleum-based product and choose linseed instead (it’s been doing this job just fine for centuries). Oil the wooden handles to keep it moist and prevent cracking; oil the metal parts to keep rust away.
If you want to be extra attentive, store your tools in a winter bed. In a bucket or large tub, mix ¾ quart linseed oil with 5-gallons of slightly damp sand. Push your instruments into this mixture, blade side down to help condition and clean the metal.
Don’t forget the wheelbarrow! Tighten up all nuts and screws and give it a good cleaning. Don’t inflate the tires yet, they will likely deflate again before spring. If storing outdoors, make sure your cart is turned upside down, so it’s not weighed down by rain and snow.
2. Scavenge!
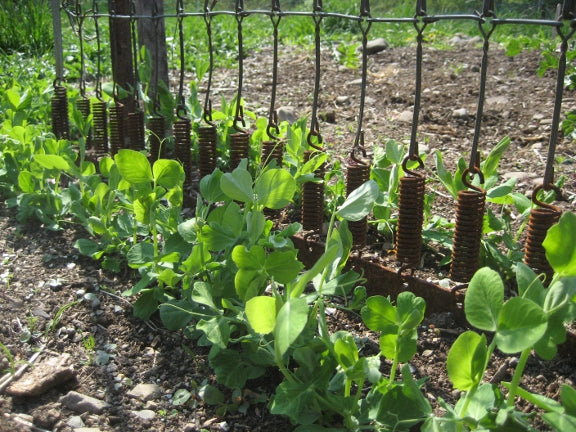
In upstate New York, we are blessed and cursed by an overabundance of used things. The good news is that, with their original jobs abandoned, these things can find a second life furnishing our gardens. At the Seed Library, the bed-spring pea trellis is one of our many examples of re-purposing. Peas, beans, tomatoes, cucumbers, and squash also love climbing up old ladders, screen doors, drying racks, or various objects (from sticks to rebar) arranged in a tee-pee shape. Old blinds can transform into waterproof plant labels and old forks make great holders for them: just stick forks handle side into the ground, and use the prongs to hold labels or seed packs. Old pallets easily double as compost bins. Egg crates are practically made for seed starting. Wooden wine and milk boxes make instant planters. That’s just a start. Look around your closet or your barn and see what can be re-purposed to improve your garden, then expand your territory and check out the closest junk shops. Although it can be tempting to start a bright new season with bright new things, you might be surprised by how many resources you already have in the form of orphaned household items. And, your new seeds aren’t picky: if anything, they may enjoy being surrounded by a vintage aesthetic.
3. Build!
Compost is needed to return nutrients to your garden. Not all of us garden in a place that allows composting, but for those that do, one of the simplest set-ups is to make a pallet bin. Shipping pallets can be found all over (loading docks of box stores is fertile ground) and are often used just once before being discarded. The most basic instructions for a pallet compost bin are: glean four similar sized pallets; stand upright to form a square; connect the corners by screwing them together or tying with strong rope or wire. Voila! For easier access and room for expansion, try leaving the fourth side off. For a visual, type “pallet compost bin” into Youtube to see an overwhelming collection of instructional videos.
Raised beds are a great solution to poor soil or limited garden space. See Erin’s tutorial on how to build one.
Cold frames extend the season and make a great seed starting environment. Here, Doug explains how to make one.
Hoop houses extend the season even further! Here's the one on our farm.
Rainwater harvesting, beehives, pedal-powered power tools? Our friends at the National Young Farmers Coalition have an ever-expanding list of open sourced farm and garden tools. Here is their current list of projects: Farm Hack.


