 Seed saving falls into two general categories: dry processing and wet processing. Earlier this season, we discussed how to save seeds from some dry crops. Now, as our harvest baskets overflow with fruiting vegetables, is a great time to go over wet-processing basics.
Wet processing refers to seeds that need to be fermented in water for a while in order to separate the seed from the flesh of the fruit surrounding it. This most often applies to the plants that produce seeds inside of their fruits. Tomatoes are a great example - their seeds can be seen in the folds and crevices of a tomato slice. Other crops that fall into this category are: cucumbers, summer and winter squash, melons, peppers, eggplants, ground cherries, and tomatillos.
On the seed farm, we were lucky to acquire a wet processing machine last season, which cut out hours and days of chopping up peppers, getting soaked in tomato juice, and fighting bees off of overly-ripe melon slices. In other words, wet processing can get a little tedious, but really, only on a large scale. Going through this process for a home garden or even a few home gardens, is fast and easy. Often, one tomato or one watermelon will yield more than enough seeds for next season’s plantings!
Before proceeding with processing, we suggest brushing up on good seed saving principles (and some important considerations, like cross-pollination). Ken has outlined them in his article titled Seeds and Salsa. And, yes, it does involve salsa. Now, onto wet processing:
Start by harvesting your seed crop. Remember to only choose healthy specimens and especially ones with desirable traits you’d like to see grow again. The fruits should be over-ripe, and for some crops, borderline rotting (see below for the specifics on each crop).
 Next, chop or smash (depending on what you are harvesting) up the fruit and place into a container (jar or bucket, for example). A sharp knife, a cutting board ideally with a lip, and a potato masher are good tools for this step.
Then, add water, just enough to cover the mixture and let it stand for two or more days to ferment. Fermenting some crops helps significantly increase their germination levels. Fermentation strips the seeds of their germination-inhibiting coats, by mimicking the process of rotting or digestion (as if the seed went through the digestive system of an animal).
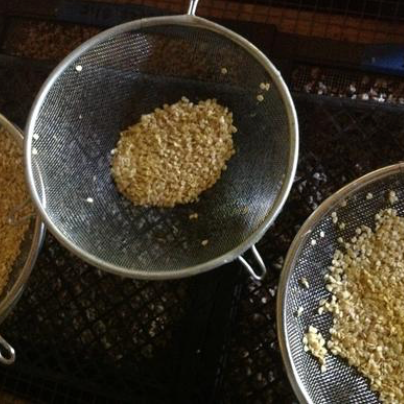
Once your seeds are fermented (beware: the mixture has turned to stinky goo), it is time to clean them, separate the seeds from the flesh. If your container has a sealed lid and is small enough to shake, then shake it vigorously. If it’s larger, use a stick, or any garden tool, to agitate the mixture so that most of the seeds fall away from the flesh and skin of the fruit. Add more water to the mixture and wait a few minutes for the mass to settle. Then, get a second container – a bowl or a bucket – and very slowly pour the extra water into the second container until most of the pulp pours off and what you are left with are seeds at the bottom of the first container. Healthy seeds will always sink, while dead seeds will float to the surface. Repeat this process until seeds are completely clean and compost the remaining pulp.
 Finally, dry your clean seeds by laying them out in a single layer onto a metal screen (they will stick to paper or fabric) and leaving them in a dry, breezy place out of direct sunlight. It’s important to speed this process along to avoid the seeds from rotting, so directing a fan (on a slow setting) onto the seeds and turning them once a day is helpful.
A note on storage: After the seeds are clean and dry, keep them in a paper bag for a few more weeks to extract any remaining moisture. Then, place them in a sealed container (glass jars are great for this), and label the variety as well as month and year of harvest. Keep them in a dry, dark, and cool place. If you live in a humid area, consider adding a silica pack with the seeds to help them ward off moisture. Cool, but not freezing temperatures are ideal, but a warmer (normal room temperature) space will do okay, it just may decrease the germination rate of the seeds a bit, but not to a significant amount if you plan on sowing the seeds next spring.
Knowing When to Harvest
Tomatoes should be fully ripened, maybe even a little soft, before harvesting them for seed. For detailed instructions on how to save tomato seeds and a bonus Seed Library Salsa recipe, take a look at Ken’s article. Follow the same principles for saving tomatillo or ground cherry seeds.
With peppers, it’s safety first: wear gloves! Sweet peppers are harmless, but if you are saving hot pepper seeds, be sure to cover your hands to keep them from getting burned by pepper juice. Choose peppers that are ripe enough for eating or even a little beyond that. Cut or rip each one in half, lengthwise, and scoop out the seeds and central cone and put into water for fermentation.
Eggplants should be left to ripen way beyond the eating stage. Let the fruits dry out a bit and transform to a dull, somewhat translucent, color before picking. Then, cut them into small cubes and leave to ferment for at least four days before processing.
Cucumbers should be left on the vine past their eating stage, until they look bloated and sound a bit hollow when tapped. They should give a little if pressed. Cut in half lengthwise to reveal the seeds and scoop out with a spoon. Summer and winter squash too should be left to overripen, causing their skin to become hard. They can be hard to chop up, so be prepared to use some muscle (a machete or a saw are also helpful) to extract the seeds. Watermelons and melons can be picked at the prime eating stage, and seeds spit out into a cup as you feast.
Additional resources:
More on wet seed processing (and an image of a mechanical wet seed processor) from Cornell
A comprehensive seed saving guide from the Organic Seed Alliance


